

How to Prevent Vibration from Affecting Profile Machining Quality During High-Speed Cutting?
Trying to machine faster but getting ugly chatter marks? This vibration ruins your parts and tools. The good news is, you can control it by understanding and tackling its source.
To prevent vibration, you must optimize your cutting parameters, select short and rigid tools with balanced holders, ensure the machine structure and workpiece are firmly secured, and apply proper lubrication. A stable, well-managed setup is key to a clean, fast cut.
I’ve seen it a hundred times. A shop invests in a powerful, high-speed machine but can’t get a good finish on their profiles. They blame the machine, but the real culprit is vibration. It’s a sneaky problem that acts like a thief, stealing your accuracy, breaking your tools, and wearing out your spindle. But it’s a thief you can catch. Once you learn to recognize where it comes from, you can systematically eliminate it from your process and unlock the true speed and quality your machine was built for.
What Are the Main Sources and Risks of Vibration in High-Speed Cutting?
Hear that awful squeal during a cut? That’s your machine screaming for help. This isn’t just noise; it’s a sign of a deeper problem that is actively destroying your work.
Vibration mainly comes from machine resonance, uneven cutting forces, a lack of rigidity in the machine or tool, and worn components. The risks are poor surface quality, lost accuracy, accelerated tool wear and breakage, and even deformed parts, all of which directly cost you money.
Vibration, or chatter, is the number one enemy of high-speed machining. It doesn’t happen randomly; it has clear causes that you need to understand. The most common is machine resonance, which happens when the cutting frequency matches the natural "wobble" frequency of the tool or machine—like pushing a swing at just the right time to make it go higher. A machine that isn’t heavy and rigid enough will flex under these forces, making things worse. A dull tool is another major cause. Instead of slicing cleanly, it plows through the material, creating much higher, unstable forces that start the whole shaking process. Even something as simple as poor lubrication can cause a "stick-slip" effect that introduces vibration. Understanding these sources is the first step to fixing the problem.
Key Sources and Their Consequences
| Source of Vibration | Why it Happens | The Risk to Your Production |
|---|---|---|
| Machine Resonance1 | The cutting frequency matches the tool’s natural vibration frequency. | Causes severe chatter marks and catastrophic tool failure. |
| Uneven Cutting Force | The force on the tool tip fluctuates with every rotation and movement. | Leads to ugly waves or ripples on the part’s surface. |
| Low System Rigidity2 | The machine frame, tool holder, or workpiece flexes under cutting loads. | Results in inconsistent accuracy and accelerates machine wear. |
| Worn or Damaged Tool | A dull tool rubs and pushes material instead of cutting it cleanly. | Exacerbates all other problems and can scrap the workpiece. |
How to Optimize Cutting Parameters and Select the Right Tool for Stability?
Tired of playing guessing games with your speeds and feeds? Randomly changing parameters can make vibration even worse, wasting time and material while you search for that sweet spot.
Optimize parameters by balancing speed, feed, and depth of cut to find a stable zone. Select tools with high hardness, a geometry that reduces cutting force (like a variable helix), and the shortest possible overhang to maximize stiffness and reduce chatter.
Your cutting parameters and tool choice are your first line of defense against vibration. It’s a delicate balance. Engineers use "stability lobe diagrams3" to map out the chatter-free zones, but you can find them through careful experimenting. Sometimes, increasing the cutting speed can actually move you out of a resonance frequency and smooth out the cut. For high-speed profile machining, a common strategy is to use a smaller depth of cut but a much higher feed rate. This "light and fast" approach keeps the cutting forces low. The tool itself is just as critical. I always advise my clients to use the shortest, stubbiest tool possible for the job. A longer tool overhang acts like a lever, amplifying vibration. Use tools specifically designed for stability, like variable helix end mills4, which break up harmonic rhythms. Modern tool coatings also help by reducing friction and wear.
Your Guide to Stable Cutting
- Balance Parameters: Don’t just change one thing. Adjust your speed, feed, and depth of cut together. The goal is to find a combination that reduces cutting forces while maintaining a good chip load.
- Tool Selection is Key:
- Stiffness: Use the shortest tool possible with the largest diameter that makes sense for the job.
- Geometry: Choose tools with variable helix angles or multiple flutes to break up rhythmic forces.
- Holders: Use high-quality, balanced tool holders designed for high RPMs to prevent the entire assembly from vibrating.
- High Speed, Light Cut: A popular and effective strategy is to increase the spindle speed while taking a shallower radial and axial depth of cut. This maintains a high material removal rate but keeps the forces on the tool low and manageable.
How to Improve Machine Rigidity and Secure the Workpiece Effectively?
You’ve perfected your speeds and feeds, but the chatter persists. This often means the problem isn’t the cut itself, but the foundation: a lack of rigidity in the machine or the workpiece setup.
To improve rigidity, use a machine with a solid, heavy base and maintain it well. More importantly, use robust fixtures to clamp the workpiece securely at multiple points, preventing it from vibrating or flexing during the cutting process.
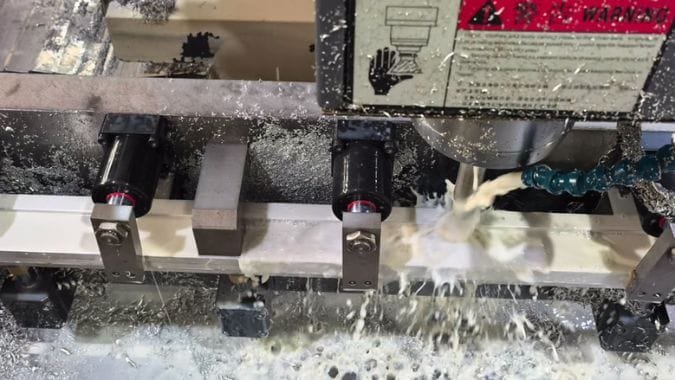
Rigidity is the opposite of vibration. A system that doesn’t move or flex under force will not chatter. This starts with the machine itself. A heavy machine with a solid cast iron base is naturally more resistant to vibration. But you can’t easily change your machine. What you can control completely is how you hold your workpiece. This is especially critical for profile machining, where you are often cutting long, thin parts that want to vibrate like guitar strings. I’ve solved so many chatter problems just by looking at the fixturing. A single clamp in the middle of a long profile is not enough. You need to support the workpiece along its length, using multiple clamping points to hold it down firmly. For very thin or flexible parts, tools like vacuum or magnetic tables can provide even, continuous support across the entire surface.
Building a Rock-Solid Foundation
- Machine Stability: The machine must be installed on a solid, level foundation. Regular maintenance is key—worn spindle bearings or loose linear guides are major sources of vibration.
- Fixture Design5: Your fixture needs to be as rigid as the machine table. Use thick, solid materials and design it to support the workpiece directly under the area being machined whenever possible. Avoid flimsy setups.
- Clamping Strategy6: For long profiles, increase the number of clamping points. This dramatically shortens the unsupported length of the material, which is the primary driver of workpiece vibration. Ensure clamping pressure is firm but distributed to avoid distorting the part.
- Specialized Workholding: For thin, flat, or delicate parts that are hard to clamp traditionally, consider using a vacuum chuck or magnetic table. This provides uniform holding force across a large area, effectively dampening vibration.
How to Apply Dynamic Compensation and Real-Time Monitoring to Reduce Vibration?
You’ve tried everything, but a specific job still has vibration issues. In these tough cases, you need a smarter approach that can adapt to the cutting conditions in real-time, stopping chatter before it ruins the part.
Modern machines use real-time monitoring with sensors like accelerometers to detect the first signs of vibration. The control system can then automatically adjust cutting parameters or use active damping systems to dynamically compensate and suppress chatter as it happens.
This is where modern manufacturing technology really shines. Instead of waiting for chatter marks to appear, we can use technology to fight back intelligently. Think of it like a car’s traction control. It doesn’t wait for a skid; it senses wheel slip and reacts instantly. In machining, we place vibration sensors on the spindle. These sensors "listen" for the tiny vibrations that are the signature of oncoming chatter. The moment they detect this, they signal the CNC control. An adaptive control system can then automatically tweak the spindle speed or feed rate in milliseconds to move out of the unstable zone. Some of the most advanced systems even have active dampers—special elements in the tool or fixture that create a counter-vibration to cancel out the chatter. This allows for much more aggressive cutting than would otherwise be possible.
Intelligent Solutions for Vibration Control
- Real-Time Monitoring: This is the foundation. High-precision sensors are mounted on the machine’s spindle to provide a live feed of vibration levels. The operator or an automated system can see a spike in vibration and know that the process is becoming unstable, allowing for immediate adjustments.
- Adaptive Control7: This is the "brain" that uses the monitoring data. An adaptive control system is a closed loop that not only monitors vibration but also has the authority to change cutting parameters on its own to maintain a stable, chatter-free state.
- Active Damping and Compensation8: This is the most advanced technology. It involves using special actuators, sometimes built right into the tool holder, that physically counteract vibration forces. When the sensor detects a vibration, an actuator creates an equal and opposite force, effectively canceling it out. This is a game-changer for delicate or long-reach machining operations.
Conclusion
Stopping vibration is key to achieving high quality at high speed. It requires a complete approach: optimizing cuts, using rigid tools, ensuring a rock-solid setup, and leveraging intelligent monitoring and compensation technology to maintain stability where it counts the most.
-
Understanding machine resonance is crucial for preventing chatter and ensuring smooth machining operations. ↩
-
Exploring low system rigidity can help you improve accuracy and reduce wear in your machining processes. ↩
-
Understanding stability lobe diagrams can enhance your machining strategies, helping you avoid chatter and improve cut quality. ↩
-
Exploring variable helix end mills can provide insights into advanced tool designs that minimize vibration and enhance machining performance. ↩
-
Explore this link to learn how effective fixture design can enhance machining stability and reduce vibration. ↩
-
Discover innovative clamping strategies that can significantly reduce workpiece vibration and improve machining accuracy. ↩
-
Explore this link to understand how Adaptive Control enhances machining stability and efficiency, revolutionizing manufacturing processes. ↩
-
Discover the mechanics behind Active Damping and Compensation, a breakthrough technology that significantly improves machining precision and performance. ↩

Chris Lu
Leveraging over a decade of hands-on experience in the machine tool industry, particularly with CNC machines, I'm here to help. Whether you have questions sparked by this post, need guidance on selecting the right equipment (CNC or conventional), are exploring custom machine solutions, or are ready to discuss a purchase, don't hesitate to CONTACT Me. Let's find the perfect machine tool for your needs.