

When is a Steady Rest Required on a CNC Lathe?
Long, thin shafts often shake and vibrate during turning operations. This "chatter" ruins your surface finish and makes holding tight tolerances impossible. A steady rest is the simple solution to fix this rigidity problem.
You must use a steady rest when the length-to-diameter ratio (L/D) of your workpiece exceeds 2.5:1. It provides crucial radial support for long parts, preventing them from bending under cutting pressure. It is also mandatory when performing internal operations like boring or threading on the end of a long shaft.
Many operators try to cheat the physics. They slow down the spindle or take lighter cuts. But eventually, the part comes out oval, or the tool chatters. Do not let vibration destroy your expensive project. Read on to master the steady rest setup.
What is a Steady Rest?
You often see this device sitting on the lathe bed, but do you know exactly how it works? Ignoring its proper function can lead to dangerous machining errors and scrap parts.
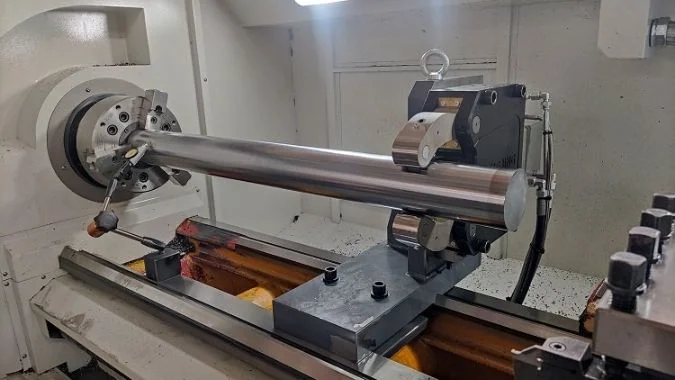
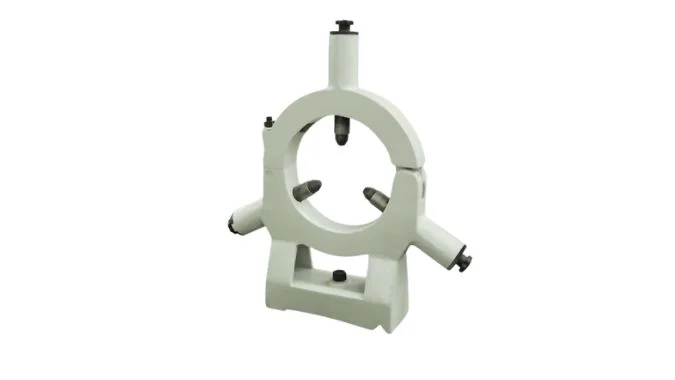
A steady rest is a support device that mounts to the lathe bed. It uses three adjustable jaws or rollers to hold the middle of a rotating workpiece. It acts as an intermediate fulcrum, increasing rigidity and stopping the part from deflecting during heavy cutting operations like turning, boring, or knurling.
A steady rest is an auxiliary device. We use it to radially support rotating workpieces1. Its main goal is simple. It increases the stiffness of the workpiece. It stops the vibration that comes from slender or flexible parts. This reduces machining errors2 significantly.
It sits on the lathe bed or guide rails. It provides support in the middle of the part. It contacts the workpiece with adjustable support jaws or pads. I find this tool is perfect for long shafts, slender rods, or crankshafts. These parts deform easily without support.
The selection of the right steady rest depends on your production size.
- Manual Steady Rests: These are great for large batches. You set them up once for a specific diameter. They provide centering for multiple clamping operations. They often use bearings or brass tips to reduce friction.
- Hydraulic Steady Rests: I recommend these for small batches or complex parts. If you are doing turn-milling, these are best. They allow you to do all operations in one setup.
- Hydrostatic Steady Rests: For our heavy-duty clients, we use these. They can support parts weighing tens of tons. They use an oil film for lubrication. This handles fine-tuning needs and keeps the support stable.
For high-precision work, we use steady rests with servo drives. They have grating feedback mechanisms. They position themselves automatically. This is vital when you need high coaxiality.
When Should You Choose a Steady Rest Over a Tailstock for Support?
Everyone uses a tailstock, but sometimes it is simply not enough for the job. Relying only on end support can cause the middle of your long shaft to bow out.
You should choose a steady rest when you need to machine the end face of a shaft or when the part is too long and sags in the middle. While a tailstock supports the tip, a steady rest supports the mid-section against radial cutting pressure.
Choosing between a steady rest and a tailstock3 depends on the shape of your part. It also depends on what stage of machining you are in. Here is how I break it down for my team.
The "Boring" Problem
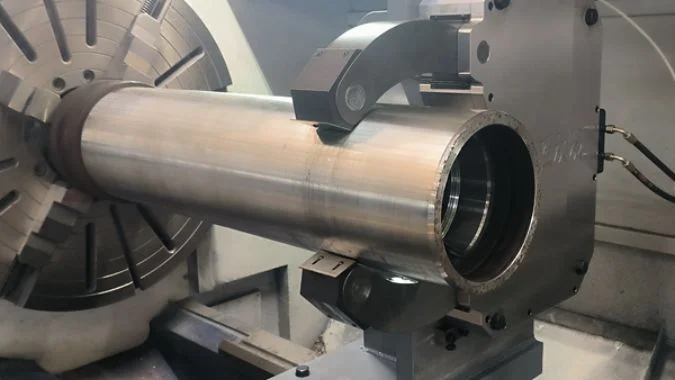
This is the biggest difference. If you need to drill, bore, or tap internal threads into the end of a long shaft, you cannot use a tailstock. The tailstock sits exactly where your tool needs to go. A steady rest holds the shaft securely from the outside. This leaves the end face completely open. This allows you to machine internal features on long parts with high precision.
When the part is too flexible
If the length-to-diameter ratio is over 2.5, the part is weak. Cutting forces will push it away. This causes vibration. A tailstock only holds the ends. The middle is still free to bend. A steady rest adds a "third hand" in the middle (an intermediate fulcrum) to stop this.
Rough Machining
During rough cuts, forces are high. Radial forces can hit 1000N or 1500N. A steady rest is rigid. It withstands this load. A tailstock might flex. Also, if you are turning a hollow tube, a tailstock center creates outward pressure that might split the tube. A steady rest holds the outside, which is safer.
Structural Limitations
I look at the steps on the part. If a shaft has no steps (like a seamless pipe), a steady rest is easy to place anywhere. If the part has many small steps, a steady rest might hit the shoulders. In that case, we are forced to use a tailstock.
| Feature | Tailstock | Steady Rest |
|---|---|---|
| Support Location | End of the part only | Middle or any length of the part |
| End Machining | Impossible (blocks access) | Excellent (leaves end open) |
| Rigidity | Moderate (prone to middle flex) | High (prevents bowing) |
| Setup Time | Fast | Slower (needs alignment) |
Can Using a Steady Rest Directly Improve the Surface Finish and Dimensional Accuracy of Long Shafts?
Chatter marks are the enemy of every machinist who wants a clean look. You try slowing down the spindle, but the vibration remains. This tool is the direct fix for poor finishes.
Yes, it directly improves quality by eliminating harmonic vibrations and deflection. Without it, a long part pushes away from the tool, creating tapered cuts and rough surfaces. The steady rest keeps the diameter concentric with the spindle axis along the entire length.
I have handled many projects involving special vehicle parts. We often see long axles4. Without a steady rest, the surface finish is always poor. Here is why this tool is critical for quality.
Stopping the "Push-Away" Effect
When the tool touches a long shaft, the shaft wants to bend away. This is deflection. If the part bends away by 0.1mm, your cut is 0.1mm too shallow. When the tool retracts, the part springs back. This creates a taper error. The middle of the shaft ends up thicker than the ends. A steady rest stops this. It holds the part firm. The tool cuts exactly what you programmed.
Killing Vibration
Vibration leaves ugly chatter marks. It looks like a pattern of waves on the metal. This happens because the long part acts like a guitar string. The steady rest acts like a finger on the string. It stops the resonance. The result is a smooth, mirror-like finish.
Consistent Datums
In turn-milling centers, we use the steady rest with the tailstock. This keeps the positioning accurate. It ensures the machining datum stays consistent. If you are doing precise work, like on our steel-making mill rolls, runout errors are not acceptable. The steady rest minimizes runout and ensures the part remains concentric with the spindle axis.
If the part looks rough, do not just change the insert. Check your support. The steady rest is often the key to fixing the finish.
How Can Improper Setup or Alignment of a Steady Rest Damage the Part?
A steady rest is helpful, but a bad setup is destructive. If you align it wrong, or tighten it too much, you will scrap the part immediately.
Improper alignment forces the workpiece off-center. This creates severe runout, burns the surface due to friction, or causes the part to twist and snap. Over-tightening the jaws creates "lobing" errors where the part becomes triangular instead of round.
Setting up a steady rest requires care. It is not just about clamping it down. You need to align it perfectly with the spindle axis. If you get this wrong, you will damage the machine and the part.
The Risk of Over-Constraint
The support points must be even. If they are not, you create over-constraint5. This leads to taper errors. Worse, it can twist the workpiece. I have seen shafts that looked fine but were twisted internally because the steady rest was fighting the chuck. This stress remains in the part and causes warping later.
Binding and Friction Heat6
Friction is a major issue. If you use a manual steady rest with fixed pads, you need constant lubrication. Without oil, the pads will generate excessive heat. This heat expands the metal, changing your dimensions mid-cut. In severe cases, it causes "scoring" or "marring," where the pads dig into the part and ruin the surface finish.
Center Alignment
The center of the steady rest must match the center of the lathe spindle. If the steady rest is slightly lower or higher, it bends the part every time it rotates. This causes eccentricity. The part will not be round.
Timing Matters
In actual operation, you must know when to activate the steady rest. You decide this based on the material and the cutting data. If you clamp it on a surface that is not round (like a rough casting), the steady rest will copy that oval shape into your final cut. You must turn a "spot" or a true surface first, then clamp the steady rest on that spot.
Conclusion
A steady rest is essential for any part with a length-to-diameter ratio over 2.5. It ensures safety, allows for end-face machining, and guarantees the high precision J&M Machine Tools delivers.
-
Exploring this link will provide insights into the advantages and applications of rotating workpieces in various machining processes. ↩
-
This resource will offer valuable strategies and techniques to minimize machining errors, enhancing production quality. ↩
-
Exploring tailstocks will help you determine the best support for your machining projects, ensuring better results. ↩
-
Exploring the impact of long axles on machining can help you optimize your projects and avoid common pitfalls. ↩
-
Understanding over-constraint is crucial to prevent taper errors and ensure precision in machining. Explore this link for detailed insights. ↩
-
Friction heat can significantly impact your machining results. Learn more about its effects and how to manage it effectively. ↩

Chris Lu
Leveraging over a decade of hands-on experience in the machine tool industry, particularly with CNC machines, I'm here to help. Whether you have questions sparked by this post, need guidance on selecting the right equipment (CNC or conventional), are exploring custom machine solutions, or are ready to discuss a purchase, don't hesitate to CONTACT Me. Let's find the perfect machine tool for your needs.