

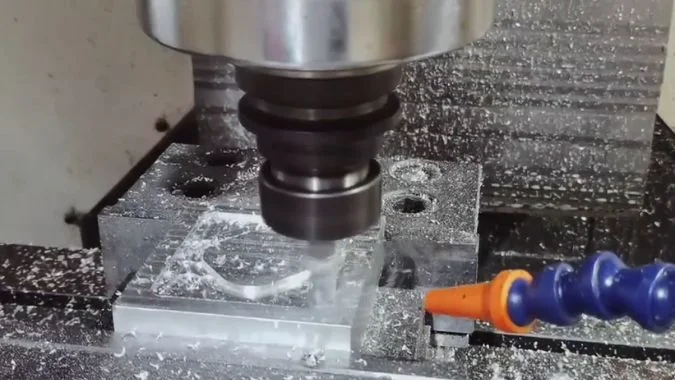
Milling cutter marks can turn a qualified-looking part into a rejected part. Small lines may hide tool wear, vibration, runout, or wrong cutting data.
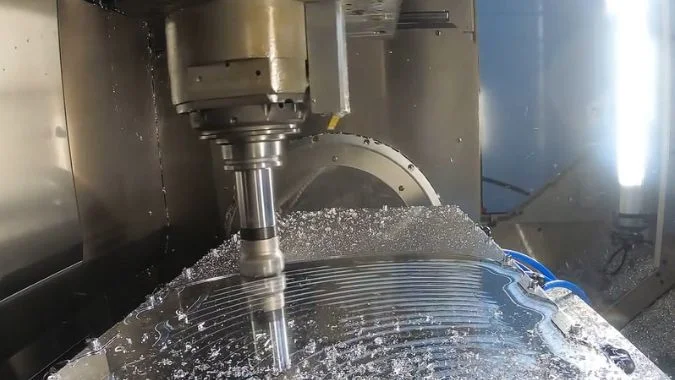
Milling cutter marks are regular or irregular patterns left on a machined surface by a rotating milling tool. They may appear as parallel lines, arc ripples, uneven scratches, or local dents. Their severity is often measured by surface roughness values such as Ra and Rz.
Milling marks are not only a visual issue. They can affect sealing, sliding, coating, fatigue life, and assembly accuracy1. A clear diagnosis helps separate normal tool path texture from a real machining defect.
How Do Tool Wear, Geometry, and Material Selection Cause Milling Marks?
The cutter creates the final surface directly. A small edge defect can become a repeated mark across the whole workpiece.
Tool wear, built-up edge, wrong tool geometry, and poor tool material selection can all create milling marks. Worn edges plow instead of cut. Incorrect rake angle, small corner radius, or mismatched coating can increase friction, vibration, and surface roughness.
Tool wear and built-up edge
Tool wear is one of the first items to check when milling cutter marks appear. A sharp cutting edge shears material cleanly. A worn edge rubs and plows the surface. This plowing action creates deeper and less stable marks. Flank wear usually produces regular but heavier lines because the worn flank face has more contact with the workpiece. Crater wear can change chip flow and raise cutting temperature. That condition can lead to built-up edge.
Built-up edge, often called BUE2, forms when workpiece material sticks to the cutting edge under heat and pressure. This stuck material becomes a false cutting edge. Its shape is not stable. It grows, breaks away, and grows again. Because of this, BUE often creates irregular deep and shallow marks. Aluminum, low-carbon steel, and sticky stainless steel are common materials where BUE appears3 if cutting speed, coolant, or coating is not suitable.
Tool geometry and tool material
Tool geometry decides the basic shape and depth of milling marks. A larger corner radius lowers the theoretical residual height. This usually improves finish. Yet a very large radius increases cutting force, so weak machines may chatter. A positive rake angle lowers cutting resistance and helps create a cleaner surface4. Yet a very sharp edge may chip when machining hard materials.
Tool material also matters. HSS tools are useful in some low-speed work, but they wear quickly in high-speed or hard-material milling5. Carbide tools keep hardness better at high temperature. Coated carbide tools, such as TiAlN or AlCrN coated tools6, reduce friction and improve wear life. Correct flute count is also important. Too many flutes in soft material may block chips. Too few flutes in hard finishing may reduce surface stability.
The table below is better used as a cause-to-action map. It links the tool condition with the surface result and the first correction direction.
| Tool factor | Surface sign | Why it happens | First correction |
|---|---|---|---|
| Flank wear | Regular but deeper lines | The worn flank rubs the finished surface | Replace, index, or regrind the tool |
| Chipped edge | Repeated dent or one clear strip | One tooth cuts deeper than others | Inspect every tooth or insert |
| Built-up edge | Random deep and shallow marks | Stuck material forms an unstable false edge | Adjust speed, coolant, coating, or sharpness |
| Small corner radius | Clear feed marks | Residual height becomes larger | Use a larger radius if rigidity allows |
| Weak rake geometry | Rough and torn surface | Cutting force becomes higher | Use a more positive rake geometry |
| Poor coating match | Fast wear or sticking | Heat and friction are not controlled | Match coating to the work material |
| Wrong flute count | Chip clogging or vibration | Chip space or tooth engagement is unsuitable | Select flute count by material and operation |
How Do Improper Cutting Parameter Settings Lead to Poor Surface Finish?
Good tools can still leave bad marks when cutting data is wrong. Feed, speed, depth, and step-over control the surface more than many factories expect.
Improper cutting parameters cause milling marks by increasing residual height, heat, tool wear, and vibration. Excessive feed per tooth deepens marks quickly. Wrong spindle speed can cause built-up edge or overheating. Excessive depth of cut increases cutting force and chatter.
Feed rate and residual height
Feed rate is closely tied to visible milling lines. The important value is feed per tooth, often written as fz. In a simple finishing model, theoretical residual height can be estimated as Rth = fz² / (8 × r)7. In this formula, r is the corner radius. This formula shows a very important point. If feed per tooth doubles, theoretical residual height becomes four times larger8. Because of this, a small increase in feed can create a large change in surface finish.
Many workshops increase feed rate to save cycle time. This works for roughing if the surface will be finished later. It can fail during finishing. A surface may then need another pass, polishing, or rework. The saved time disappears. For finishing, feed per tooth should match the tool radius, required Ra value, tool runout, and machine rigidity.
Speed, depth of cut, and cutting force
Spindle speed controls cutting speed. If cutting speed is too low, BUE becomes more likely in sticky materials. The surface then shows torn, rough, and random marks. If cutting speed is too high, tool temperature rises. Coating failure, edge softening, and rapid wear may follow. The best surface finish usually appears inside a stable cutting speed range, not at the highest possible speed.
Depth of cut also affects the finish. Large axial depth of cut and radial depth of cut increase cutting force. Higher cutting force bends the tool, holder, spindle, and workpiece. This deflection changes the real cutting path and leaves uneven marks. During finishing, a light and stable allowance is better than one heavy final pass. A common process error is leaving too much stock after roughing and forcing the finishing tool to remove it in one pass.
The table below separates each cutting parameter by three questions. This makes the table more useful for troubleshooting instead of only listing problems.
| Parameter | What it mainly changes | If it is not suitable | Better control method |
|---|---|---|---|
| Feed per tooth | Residual height and tooth load | Deep regular feed marks | Lower fz or use a larger corner radius |
| Spindle speed | Heat, chip flow, and BUE risk | Torn marks, heat wear, or rough finish | Stay inside a stable speed range |
| Axial depth of cut | Vertical cutting load | Chatter, deflection, and waves | Use lighter finishing depth |
| Radial depth of cut | Side force and tool bending | Side-wall marks and vibration | Reduce ae or change engagement |
| Step-over | Ridge height between passes | Visible tool path texture | Use smaller step-over for finishing |
| Finishing allowance | Load stability in final pass | Uneven finish or tool overload | Leave stable and even stock |
How Do Machine Tool Rigidity and Spindle Condition Affect Milling Marks?
Surface finish is not decided by the cutter alone. A weak machine or tired spindle can copy vibration directly onto the workpiece.
Poor machine rigidity and spindle condition create milling marks through runout, vibration, deflection, bearing wear, loose holders, and weak workholding. Even small spindle runout can make each tooth cut a different amount and produce wave-like or uneven surface patterns.

Spindle runout and holder condition
Spindle runout means the rotating axis does not stay perfectly centered9. It is often measured as TIR, or Total Indicator Reading. Even 0.005 mm of runout can change the cutting load on each tooth10. One tooth may cut more. Another tooth may rub more. This creates alternating deep and shallow marks. In face milling, runout can make one insert dominate the cut. The surface then shows repeated arcs or ridges.
The tool holder can add more error. Worn taper contact, dirt on the taper, damaged collets, loose pull studs, and poor balance can all increase runout. A long tool overhang makes the problem worse because it increases bending. During high-speed milling, poor balance can also excite vibration. The result is often a repeated wave pattern or chatter marks.
Machine rigidity, workholding, and vibration
Machine rigidity includes the spindle, column, table, guideways, ball screws, fixture, and workpiece support. If any part is weak, cutting force can move the tool or workpiece. This movement leaves marks on the surface. Older machines often show this problem more clearly. Worn guideways, loose gibs, aging spindle bearings, and backlash can reduce cutting stability11.
Workholding is also part of the rigidity chain. Thin plates, tall parts, long shafts, and weak fixtures can vibrate during milling. A cutter may sound normal at first, but the surface may show ripples after the pass. In one common shop case, the cutter was replaced several times, but the marks stayed. The real cause was a fixture plate that flexed under side milling force. After extra support blocks were added, the marks dropped sharply.
The table below follows the machine accuracy chain. It starts from the spindle and moves outward to the holder, tool, fixture, and workpiece.
| Accuracy chain position | Risk source | Mark pattern often seen | Check method |
|---|---|---|---|
| Spindle | Runout | Alternating deep and shallow lines | Measure TIR with a dial indicator |
| Spindle bearing | Wear or heat | Ripple or chatter pattern | Check noise, heat, and vibration |
| Spindle taper | Dirt or poor contact | Random runout changes | Clean and inspect taper contact |
| Tool holder | Collet wear or weak clamping | Uneven repeated marks | Check holder, collet, arbor, and pull stud |
| Tool setup | Long overhang | Chatter and wave marks | Shorten tool and holder setup |
| Fixture | Weak support | Local vibration marks | Add support or clamp near cutting zone |
| Machine structure | Looseness or backlash | Unstable finish across a wider area | Check guideways, screws, and backlash |
What Is the Step-by-Step Diagnostic Process to Systematically Find the Source of Milling Marks?
Random parameter changes waste time. One change can hide another problem and make the real cause harder to find.
A systematic diagnosis starts with identifying the mark pattern, then checking the tool, cutting parameters, workholding, spindle runout, machine rigidity, coolant, and material condition. Only one variable should be changed at a time so the true cause can be confirmed.
The first step is to classify the mark. Equidistant parallel marks often relate to feed per tooth. Arc-shaped ripples often appear in face milling and may relate to insert height, cutter path, or runout. Irregular deep and shallow marks often point to vibration, BUE, or unstable workholding. Local strip dents may mean one cutting edge is chipped.
The second step is tool inspection. The cutter should be checked under magnification if possible. Flank wear, edge chipping, coating peeling, BUE, and uneven insert height must be noted. If an indexable cutter is used, all inserts should be inspected. One damaged insert can mark the whole surface. The holder, collet, arbor, and pull stud should also be checked.
The third step is a simple test cut with a fresh or known-good tool. If the marks disappear, the cause is likely tool related. If the marks remain, the process must move to parameters and machine checks.
The fourth step is reviewing cutting data. Feed per tooth, spindle speed, axial depth, radial depth, and step-over should be compared with tool supplier ranges and material behavior.
The fifth step is to reduce cutting load in a controlled way. Feed per tooth can be lowered first. Then depth of cut can be reduced. Only one change should be made at a time. If marks reduce after lowering feed, residual height or cutting load was likely too high. If marks reduce after lowering depth, chatter or deflection was likely involved.
The sixth step is checking spindle and holder runout. TIR should be measured at the tool shank and near the cutting edge when possible. A clean taper and correct tool clamping are required before measurement.
The seventh step is checking workholding and machine rigidity. The fixture should support the part close to the cutting zone. Thin walls need special care. Machine backlash, guideway condition, and spindle bearing health should be checked if the same marks appear across many jobs.
The eighth step is reviewing coolant and material. Poor coolant direction can allow heat and BUE. Material hardness changes, scale, casting skin, and welded areas can also change the surface.
Surface pattern → Tool inspection → Known-good tool test → Cutting data review → Load reduction test → Runout check → Rigidity check → Coolant and material review
This flow keeps the logic clean. The surface pattern gives the first clue. The tool check removes the most direct cause. The known-good tool test confirms whether the cutter is responsible. The parameter review checks feed, speed, depth, and step-over. The load reduction test separates residual height from chatter. The runout check confirms spindle, holder, or tool rotation error. The rigidity check looks at the fixture, workpiece, and machine body. The coolant and material review checks heat, chip removal, BUE, scale, hard spots, and material changes. Each action should be done one by one. If several variables change at the same time, the surface may improve, but the real cause may still remain unclear.
Conclusion
Milling cutter marks come from the tool, data, machine, setup, and material. A step-by-step check finds the cause faster than random adjustment.
-
"Fatigue Life Prediction of Machined Specimens with the … – PMC", https://pmc.ncbi.nlm.nih.gov/articles/PMC8472297/. Engineering research has established that surface roughness significantly influences fatigue strength, wear resistance, and contact performance in mechanical assemblies, with rougher surfaces typically reducing fatigue life by creating stress concentration sites. Evidence role: expert_consensus; source type: paper. Supports: the relationship between surface finish and mechanical performance. Scope note: Studies vary by material type and loading conditions ↩
-
"Chip formation – Wikipedia", https://en.wikipedia.org/wiki/Chip_formation. Built-up edge (BUE) is a well-documented machining phenomenon where work material adheres to the cutting tool under specific temperature and pressure conditions, forming an unstable protrusion that periodically breaks away and reforms, affecting surface quality. Evidence role: definition; source type: encyclopedia. Supports: built-up edge as a defined machining phenomenon. ↩
-
"Effect of Built-Up Edge Formation during Stable State of Wear in AISI …", https://pmc.ncbi.nlm.nih.gov/articles/PMC5706177/. Machining research identifies that materials with high ductility, work hardening tendency, and chemical affinity to tool materials at intermediate cutting speeds are most susceptible to built-up edge formation, including aluminum alloys, low-carbon steels, and austenitic stainless steels. Evidence role: mechanism; source type: paper. Supports: material characteristics that promote built-up edge formation. ↩
-
"Experimental investigation of the effect of cutting tool rake angle on …", https://www.academia.edu/21778435/Experimental_investigation_of_the_effect_of_cutting_tool_rake_angle_on_main_cutting_force. Machining theory establishes that positive rake angles reduce the cutting force by decreasing the shear plane angle and friction at the tool-chip interface, generally improving surface finish, though excessively positive angles may weaken the cutting edge in hard materials. Evidence role: mechanism; source type: education. Supports: the influence of rake angle on cutting mechanics. Scope note: Optimal rake angle depends on workpiece material hardness and cutting conditions ↩
-
"High-speed steel – Wikipedia", https://en.wikipedia.org/wiki/High-speed_steel. High-speed steel maintains hardness up to approximately 600°C, while cemented carbide tools retain hardness at temperatures exceeding 900°C, explaining the superior performance of carbide in high-speed and hard-material machining where cutting temperatures are elevated. Evidence role: mechanism; source type: education. Supports: the temperature-dependent hardness limitations of high-speed steel. ↩
-
"Influence of Nanocomposite PVD Coating on Cutting Tool Wear …", https://pmc.ncbi.nlm.nih.gov/articles/PMC12073052/. Research on physical vapor deposition (PVD) coatings demonstrates that titanium aluminum nitride (TiAlN) and aluminum chromium nitride (AlCrN) coatings provide enhanced oxidation resistance and hardness retention at elevated temperatures compared to uncoated carbide tools. Evidence role: general_support; source type: research. Supports: the performance benefits of advanced tool coatings. Scope note: Optimal coating selection depends on specific workpiece materials and cutting conditions ↩
-
"[PDF] Analytical Surface Roughness Parameters of a Theoretical Profile …", https://wumrc.engin.umich.edu/wp-content/uploads/sites/51/2013/08/03_MST_surface_roughness.pdf. The theoretical residual height formula derives from the geometric relationship between tool nose radius and feed per tooth in milling operations, representing the idealized cusp height left between adjacent tool paths under perfect cutting conditions. Evidence role: mechanism; source type: education. Supports: the geometric relationship between cutting parameters and theoretical surface finish. Scope note: Actual surface finish depends on additional factors including tool wear, vibration, and material behavior ↩
-
"Speeds and Feeds", https://web.mae.ufl.edu/designlab/Advanced%20Manufacturing/Speeds%20and%20Feeds/Speeds%20and%20Feeds.htm. The quadratic relationship between feed per tooth and residual height derives from the geometric intersection of circular tool paths, where the cusp height between adjacent passes is proportional to the square of the feed distance divided by the tool radius, as demonstrated in fundamental machining geometry. Evidence role: mechanism; source type: education. Supports: the geometric basis for the quadratic relationship. Scope note: This represents idealized geometry without accounting for tool deflection, wear, or material spring-back ↩
-
"Measure and Fix Spindle Runout – The Tool Life Killer", https://tormach.com/articles/measure-fix-spindle-runout-tool-life-killer?srsltid=AfmBOor1AVdoGa0odJCwyPtaWmAu8uqDyc5d8403UUssMvF17oy5WP8H. Spindle runout, measured as Total Indicator Reading (TIR), quantifies the radial deviation of a rotating spindle from its ideal axis of rotation and is a critical parameter in machine tool accuracy standards such as ISO 230-7. Evidence role: definition; source type: education. Supports: spindle runout as a defined measurement of rotational accuracy. ↩
-
"[PDF] Runout effects in milling: Surface finish, surface location error, and …", https://mtrc.utk.edu/wp-content/uploads/sites/45/2019/09/runout_ra_sle_stability.pdf. Machining research indicates that runout in the micrometer range causes unequal chip load distribution among cutting edges in multi-tooth tools, resulting in uneven tool wear and surface finish variations, with effects becoming more pronounced as runout increases relative to feed per tooth. Evidence role: general_support; source type: paper. Supports: the sensitivity of cutting performance to small runout values. Scope note: The specific threshold depends on tool diameter, number of teeth, and cutting parameters ↩
-
"Machine Tool Wear Prediction Technology Based on Multi-Sensor …", https://pmc.ncbi.nlm.nih.gov/articles/PMC11054666/. Machine tool condition monitoring research establishes that wear in critical components including guideways, bearings, and drive systems progressively degrades static and dynamic stiffness, leading to increased positioning errors and vibration during cutting operations. Evidence role: expert_consensus; source type: paper. Supports: the relationship between machine tool condition and machining performance. ↩

Chris Lu
Leveraging over a decade of hands-on experience in the machine tool industry, particularly with CNC machines, I'm here to help. Whether you have questions sparked by this post, need guidance on selecting the right equipment (CNC or conventional), are exploring custom machine solutions, or are ready to discuss a purchase, don't hesitate to CONTACT Me. Let's find the perfect machine tool for your needs.